What makes a home feel luxurious? Is it the marble countertops or the bespoke millwork? Please. That’s just the set dressing.
I’m here to say that a good lighting plan for a luxury home is key. It’s like a modern Michelangelo’s chisel. Its role? To turn empty space into an experience.
Light, when used in layers, does more than just brighten a room. It shapes it. It brings out the drama. It sets the mood.
Don’t just look at what you see. Think about how a room makes you feel. That’s where the magic is.
Why lighting is the quiet hero of luxury design
In a world obsessed with marble countertops and statement furniture, lighting is the real star. It’s the director of your home’s visual story. Get it wrong, and even the most beautiful architecture feels dull, like a big-box store.
Think of a museum. It uses spots to make paintings glow, inviting you in. Your living room should get the same care. Lighting doesn’t just help you see the room; it dictates how you feel about it. It can make a ceiling feel vaulted, a hallway feel endless, and that heirloom sideboard look priceless. This is the magic of feeling its narrative.
The magic comes from layered lighting. You start with a soft glow (the ambient layer). Then, add brighter lights where needed (the task layer). Lastly, use precise accents to highlight art or architecture. Brighter lights create focus, with light dimming toward the edges. This guides the eye like a subtle usher.
| Design Aspect | The Department Store Glare | The Quiet Hero Lighting |
|---|---|---|
| Mood | Flat, clinical, exposed. Feels transactional. | Dynamic, intimate, dramatic. Sets a specific emotional tone. |
| Focus | Everywhere and nowhere. The eye has no place to rest. | Intentional. Draws the viewer’s eye to curated focal points—art, a chair, a texture. |
| Perception of Space | Can make rooms feel smaller, ceilings lower. | Sculpts with light and shadow. Can make spaces feel larger, airier, or more cozy. |
| Value Perception | Makes expensive finishes look cheap and ordinary. | Makes investment pieces look more luxurious, textured, and considered. |
Beam angles are your secret weapon. A wide flood lights a wall gently. A narrow spot highlights a sculpture dramatically. The choice of beam spread sculpts with light. It’s the difference between illuminating a painting and celebrating it. By mixing beam angles in your layered lighting plan, you create depth, contrast, and a visual journey.
The result isn’t just a well-lit room. It’s an atmosphere. It’s the warmth that makes people linger at the kitchen island. It’s the drama that makes your entryway feel like an opening scene. This is why lighting is the quiet hero. It never demands a close-up. Instead, it uses layered lighting and precise beam angles to make every other element in your home look like the star it was meant to be.
Layers ambient task accent decorative and daylight integration
A single, overhead light is like a one-party state. It makes everything look the same, dull. True beauty comes from a mix of different elements.
Layered lighting is all about creating a hierarchy of light. Each part has its own role, working together for a balanced look. It’s like a democracy in your home.
The core of this system includes three main parts:
- Ambient Light: This is the overall light, like the base of a political party. It makes sure no area is too dark. Think of ceiling lights or a central fixture.
- Task Light: This light is focused on specific tasks. It’s like the expert who gets the job done efficiently. Examples include kitchen lights or desk lamps.
- Accent Light: This light adds drama, like a great speaker. It highlights special features or art, creating a story in your space.
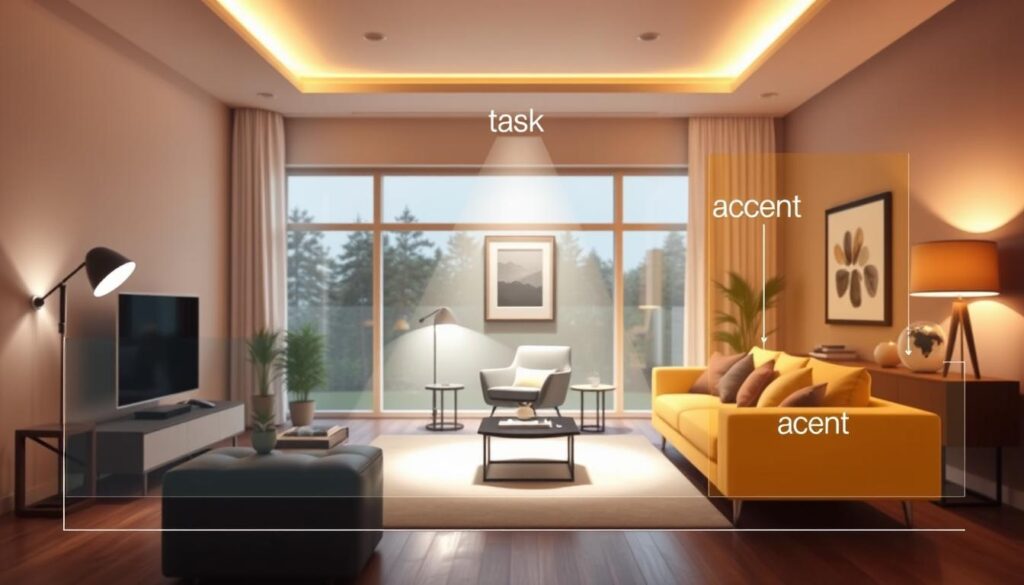
Daylight is the fourth layer, the special guest. It checks if your artificial light is good enough. A bad bulb looks terrible in daylight.
CRI and CCT are key here. They help your light bulbs work well with daylight. CRI makes colors look true, and CCT controls the light’s warmth or coolness.
Getting this right makes your home look amazing. To learn more, check out how to layer lighting for the best look and function.
Color quality CRI CCT dimming and tunable white strategy
If lighting were a wine, CRI would be the vintage and CCT would be the serving temperature. Both are key to the experience. Get them wrong, and even the most expensive bottle tastes off. In your home, this means a Picasso looks flat or your dinner guests appear vaguely unwell.
CRI (Color Rendering Index) shows how well a light source reveals colors. Think of supermarket fluorescents. They have a terrible CRI, making a $50 steak look like evidence from a crime scene. In a luxury space, a high CRI is essential. It makes fabrics rich, wood grains deep, and skin tones glow with life, not a pallor.
Then there’s CCT (Correlated Color Temperature), measured in Kelvins. This is the color *feel* of the light itself. A high, cool CCT (5000K+) feels like a brisk morning—energizing and sharp. A low, warm CCT (2700K-) feels like a fireplace—soothing and intimate. The magic happens in the daily journey between them.
Your body’s circadian rhythm craves this shift. During daylight hours, cooler light supports alertness. As dusk falls, warmer light signals relaxation. This is where dimmers become your first line of defense. A simple dimmer allows you to lower the intensity, but pairing it with warm-temperature lighting is what truly eases the transition into evening.
But why stop there? Enter the tunable white strategy. This is smart lighting that doesn’t just get brighter or dimmer. It actively shifts its CCT throughout the day. Imagine fixtures that automatically provide a cool, focused beam for your morning coffee and gradually morph into a seductive, candle-like glow for a nightcap.
This isn’t sci-fi; it’s available now. Modern systems integrate with sensors to adapt to natural light levels, filling in the gaps seamlessly. It’s circadian rhythm management meets cocktail hour sophistication. You’re not just controlling light; you’re orchestrating an environment that moves to the rhythm of your life.
And remember, the quality of this color dance is also influenced by beam angles. A wide beam spreads color evenly across a wall, while a narrow one highlights a specific hue in a painting. The angle directs how you experience the color fidelity you’ve so carefully engineered.
Optics beam spreads wall washing grazing and scallop control
Forget “on” and “off.” The real magic happens when you control the shape, texture, and direction of the light itself. This is the surgical suite of lighting design. Here, optics are the grammar that turns random brightness into a meaningful sentence. A narrow spot beam is a declarative statement. A wide flood is a conversational tone. Mastering this is how you compose light, not just broadcast it.
It all starts with beam angles. Think of it like a cinematographer choosing a lens. A tight 10-degree spot isolates a sculpture with dramatic focus. A broad 40-degree flood gently blankets a seating area in a welcoming glow. The choice dictates the story.
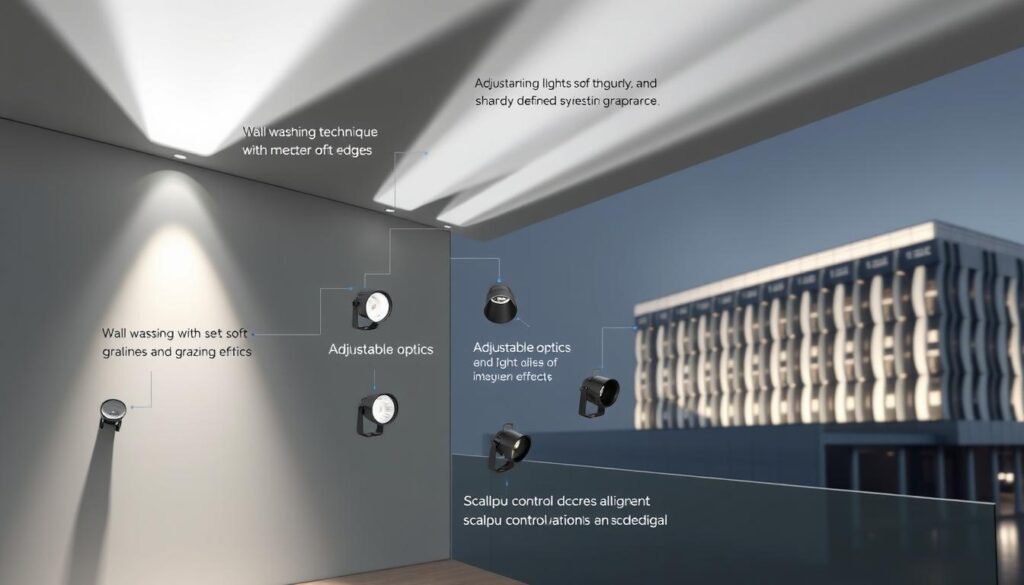
Wall washing is painting with light. You use a wide, even beam from a ceiling fixture to “wash” down a vertical surface. The goal? Erase shadows. This makes a wall feel expansive, clean, and modern. It’s perfect for showing off a bold paint color or creating a serene backdrop. The key is fixture placement to avoid that dreaded scallop.
Grazing is the opposite. Here, you place a light source very close to a surface—like stone, brick, or textured wood—and skim the beam across it. This technique loves imperfection. It exaggerates texture, making every grain and crevice sing with shadow and highlight. It turns a plain wall into a tactile experience.
And scallop control? That’s the art of banishing the awkward. Poorly placed downlights can cast half-moon shadows on the wall, a telltale sign of a thoughtless plan. By carefully selecting the fixture’s optics and its distance from the wall, you achieve a clean, seamless wash. No awkward arcs. Just pure, intentional light.
So how do you choose the right tool? It comes down to the job. Here’s your quick-reference guide:
| Beam Spread Type | Typical Angle | Primary Purpose | Best Used For |
|---|---|---|---|
| Spot | 10° – 25° | Accent & Drama | Artwork, sculptures, architectural details |
| Flood | 30° – 45° | Ambient & General | Seating areas, room corners, general illumination |
| Wall Wash | Wide, asymmetric | Visual Expansion | Making walls recede, creating smooth, shadow-free surfaces |
| Graze | Narrow, linear | Texture Enhancement | Stone facades, wood paneling, textured wallcoverings |
The real power unlocks when you assign these specific beam angles to dedicated control zones. Imagine one switch for a soft, wide flood in the living room. Another switch activates a precise spot on your favorite painting. This is how you build dynamic scenes. Adjustable fixtures are your best friend here, letting you flex and aim the light long after installation.
This precise optical work is what elevates a plan from basic illumination to architectural storytelling. It’s the logical next step after mastering the foundational layers of light. You move from having light in a room to having light *for* the room.
Room by room guidelines kitchens baths stairs art walls and media
Forget uniform overheads. True luxury lighting is a bespoke script written room by room. A one-size-fits-all plan is as useful as a monocle for a cyclops. It misses the point entirely.
The kitchen is a laboratory of contradictions. It needs shadowless, clinical light on the cutting board but a soft, intimate glow over the breakfast nook. Think of it as task lighting with a side of ambiance. Under-cabinet LEDs become your surgical tools, while a pendant over the island sets the mood.
The bathroom, a truth-teller’s arena, demands flawless vanity lighting. We engineer flattery here. Vertical sconces or a backlit mirror provide even, forgiving illumination. It’s the difference between looking ready for the day and ready for a horror movie. Get this right, and you’ve mastered the transition from private sanctuary to public persona.
Stairs are a safety feature masquerading as sculpture. Path lighting is non-negotiable. Recessed step lights or sleek wall-mounted runners guide the foot while casting dramatic shadows. It’s functional art that prevents midnight stumbles. This is where interior precision meets the thoughtful consideration you’d give to exterior lighting for a garden path.
Art walls demand museum-grade respect. This isn’t about turning on a spotlight. It’s about framing a masterpiece with precision. Picture lights or adjustable gimbals with a narrow beam spread make colors pop and textures sing. The goal is to make the art the star, not the fixture.
Then there’s the media room. This is a black-box theater operation. Ambient light is the enemy. You need absolute control zones to kill every lumen without fumbling for switches. Motorized blackout shades and dimmable cove lighting set the stage. It’s about creating a cave of pure immersion, where the only glow comes from the screen.
Each space has its own personality. The table below breaks down the non-negotiables.
| Room | Primary Lighting Layer | Key Fixture Type | Critical Consideration |
|---|---|---|---|
| Kitchen | Task + Ambient | Under-cabinet LEDs, Pendants | Eliminate shadows on work surfaces |
| Bathroom | Task | Vertical Sconces, Backlit Mirror | Even, flattering light at the vanity |
| Stairs | Accent / Path | Recessed Step Lights | Safety and sculptural form |
| Art Wall | Accent | Adjustable Picture Lights | Precision beam to highlight art |
| Media Room | Decorative + Controlled Ambient | Cove Lighting, Motorized Shades | Absolute darkness on demand |
Crafting these unique lighting personalities is what separates a house from a home. It’s the difference between illumination and emotion. Mastering control zones inside makes the transition to the magic of exterior lighting feel seamless. Every room gets its moment in the, well, perfect light.
Exterior glow entries paths landscape and glare management
Think of your home’s exterior at night as a painting. Light is your brush. The goal is to use shadows for depth and drama, not to eliminate them. This makes your home’s exterior special.
The entry sequence is like an opening act. The glow should be a soft welcome, not a harsh spotlight. We aim for visual warmth that invites, not demands. This means using light in layers, like a soft door wash and subtle side lighting.
Path lighting guides without blinding. It’s the supporting actor, not the star. Use low-level bollards or step lights that graze the ground. They offer safety without being too bright. For more on walkways, check our luxury pathway lighting guide.
Landscape lighting is about choosing what to highlight. It’s not about lighting every shrub. Instead, focus on trees, sculptures, or water features. Light a tree from below to show its canopy. Graze a stone wall to reveal its texture.
Glare is the worst enemy of outdoor lighting. It’s when you see the light source, not what it’s meant to illuminate. It’s like looking at a sculpture versus a flashlight.
To fight glare, use the right fixture placement and shielding. Position fixtures so the lamp is hidden. Use louvers, hoods, and baffles to conceal the light source.
Beam angles are critical. A wide flood light spills everywhere, while a narrow spot isolates a single branch. Choose the right beam angle to light what you want, not the whole area.
Great exterior lighting works with the night, not against it. It uses beam angles and placement to create a beautiful scene. It’s a subtle, intelligent, and beautiful way to transform your property.
Controls zoning scenes sensors and integration with shades
A beautiful lighting scheme without easy control is like a Ferrari from 1972 with a manual transmission. It has great promise but is hard to use. The real magic happens in the software—the central nervous system that brings your home to life.
Let’s explore the digital brain behind it, starting with control zones. This isn’t about electricians. It’s about how you live. For example, the kitchen island lights, under-cabinet strips, and ceiling spots form the “Culinary Prep” zone. The living room lights create the “Evening Wind-Down” zone. This makes your home more organized.
Once your zones are set, you create scenes. These are one-touch moods. “Dinner Party” dims the dining chandelier and raises the wall wash. “Movie Night” makes the room dark, except for a safe glow on the floor. You can control these scenes with a keypad, phone, or voice.
Sensors add intelligence. Motion and occupancy sensors save energy in unused areas. The daylight sensor adjusts lights based on the sun. This is where CRI and CCT tunable fixtures shine, keeping colors perfect.
The final step is integration. Your motorized shades work with your lights. During sunset, they lower together, creating a smooth scene. This is more than automation; it’s a beautiful performance.
Here’s a simple overview of control components:
- Zones: Logical groupings of fixtures based on use, not wiring.
- Scenes: Pre-programmed lighting “moments” for different activities.
- Sensors: Motion, occupancy, and daylight detectors that provide environmental feedback.
- Integration: The seamless handshake between lighting, shades, and other smart systems.
The goal is to make living easy. You shouldn’t need a manual. The system should learn and adapt. It’s the difference between a home and a home that lives with you—quietly, intelligently, and always in the right light.
Mockups aiming and on site adjustments with the designer present
Think of your lighting plan as a screenplay—it’s brilliant on the page, but the magic happens on set during the mockup. This is where theory meets the drywall. That elegant drawing with all its symbols? It’s just a hypothesis. The mockup is the experiment that proves it.
Here’s the trade secret they don’t teach in design school: this phase is non-negotiable. We temporarily rig fixtures. We physically aim them. Then we watch. Does the light graze that expensive stone wall perfectly, or does it fall flat? Is the scallop effect on the ceiling eliminated, or does it look like a bad art project? This is the moment of truth.
Having the designer and lighting specialist on site for this is like a film director blocking a scene. Tiny tweaks make the difference between good and sublime. We debate the layered lighting effect. Is the ambient layer harmonious with the accent? Or is it fighting a silent war?
This is where adjustable fixtures earn their keep. They allow us to flex the light, to redirect focus like a cinematographer. We’re not just installing lights; we’re sculpting with photons. A quarter-inch shift in a fixture’s position can change the entire mood of a room.
Our goal is to ensure the layered effect we designed survives contact with reality. That often means refining beam angles on the spot. Is that narrow spot too harsh on the painting? Let’s try a wider flood. The mockup answers these questions instantly.
It’s a collaborative, dynamic process. The designer sees the spatial impact. The lighting specialist understands the technical limits. Together, they solve puzzles. This hands-on fine-tuning is what separates a generic install from a custom masterpiece. It’s where intellectual planning becomes sensory experience.
So, never skip the mockup. It’s the final rehearsal before the show goes live. It’s where we perfect the layered lighting composition and lock in the perfect beam angles. The plan on paper is a promise. The mockup is the proof.
Budget ranges and where to splurge for impact
Talking about a lighting budget is like a delicate political strategy. The costs can vary a lot. Not every dollar is equal.
My advice? Spend more on the basics. Choose high-CRI LEDs and reliable drivers. Also, invest in a smart control system. This lets you change scenes easily.
Your outdoor lighting is key. It’s how your home looks at night. Quality here boosts curb appeal and security.
But, you can save on decorative lights. A good $500 sconce can look as great as a $5,000 one. It’s about the effect, not just the price.
You’re not just buying lights. You’re getting atmosphere, drama, and a daily experience. That’s the real value of a smart budget.